Raycaster engine in JS
Introduction
While browsing YouTube I stumbled upon this video. Fascinated by the sheer simplicity of how raycaster engines work, I decided to make a quick JavaScript port of it (the one in the video was written in C++).
Play it now!
Use WSAD keys to move, if you see only the blue gradient, press A or D to turn around and wait until you can see walls.
How does a raycaster work?
A raycasting engine draws only the things you can currently see, it never renders everything at once.
In order to determine what the player can see in any given moment, it divides the scene into columns by casting rays from the player’s position and renders only these columns. Each column represents a single ray.
But how does it know how far the player is from the obstacle exactly? Well, when it casts the rays, it waits until the rays hit a wall – then it measures the distance to that wall and draws a rectangle in the appropriate column.
Also, height can be determined thanks to this – the longer the distance, the shorter the wall has to be drawn in the column.
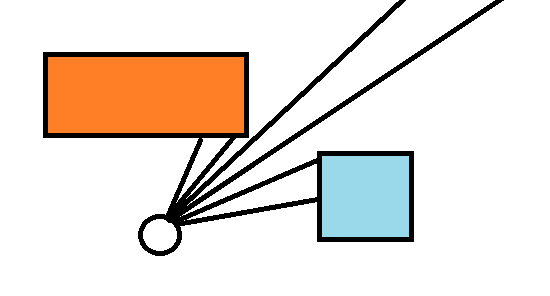
This is how the rays are cast. The orange and blue rectangles are walls and the white dot is the player. Notice how the rays are coming out of his 'eyes':
And here you can see the rendered columns, this time from the player's point of view:
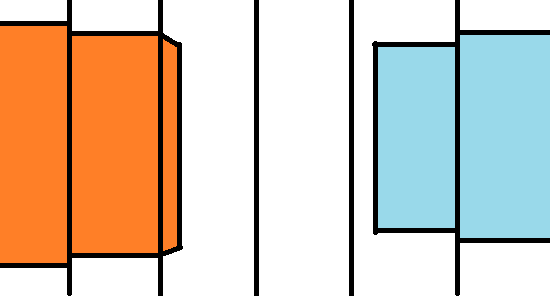
Of course in the actual program many more rays than that are used, I just wanted to show you simple diagrams to make sure everything is clear. Also, the more rays you cast, the smoother the results!
How do I code it?
Now let's move on to the part where I explain how you can code one yourself!
Basics
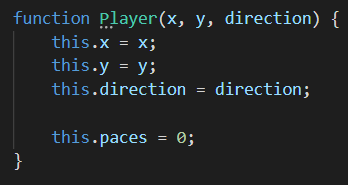
Let's start with creating the most crucial components, on which everything else will be dependant - the map and the player:
And here is the map, it will be stored in a 2D array. Each index will contain either a 0, meaning there is no wall, or 1, if there is a wall:

Get the angle of each ray
First, we have to find the angle at which to cast each ray. The angle depends on three things: the direction the player is facing, the focal length of the camera, and which column we are currently drawing.

Find the nearest gridlines
Now we have to check for walls in each ray's path. We want to end up with an array that lists each wall the ray passes through as it moves away from the player.
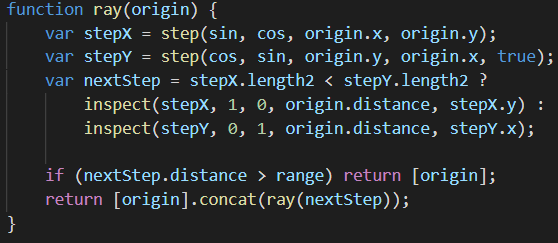
Starting from the player’s position, we try to find the nearest horizontal
(stepX) and vertical (stepY) gridlines. When we find out which one is closer, we move to it and check if a wall is there (using the ‘inspect’ function) and we do all of that until we reach the end of the ray.
Intersections
Intersections are very easy to find, for x assign whole numbers and for y just multiply the x by the slope (rise/run).
Render a column
Now that we’ve traced the entire ray, we have to draw the walls in its path. We can determine how high the walls have to be by dividing the maximum height by z. Just like in real life, the further away it is from us, the shorter it is.

Now the walls in our game look like this:

Something's wrong, we shouldn't have this weird fish-eye effect. Luckily, it's an easy fix!
Before I go into it though, let me explain why it even occurs in the first place.
Imagine that you’re standing in front of a wall. The center is much closer to you than the sides of the wall and our algorithm doesn’t this into account. In order to fix it, we will build a triangle out of each ray and find the
perpendicular distance to the wall with cosine. It sounds very difficult but in reality it requires us to slightly modify the first line like this:

And now the walls finally look good:

Render everything
Using a Camera object we can draw each frame the player sees, consisting of the columns we rendered earlier, from left to right
The Camera objects has three very important properties, namely ‘resolution’, which determines how many
rays are cast (i.e. how many columns are drawn each frame), ‘focal length’, which is just a FOV (field of view) and ‘range, which is the maximum length of each ray.
Before we draw the walls, a skybox will be rendered, like this:

Collision detection
As a finishing touch, we will add collision detecion, so that the player can't go through walls. To do that, we just have to check the position the player wants to move to before actually moving him there if there is a wall there. Also, it is worth noting that x and y are checked independently, because it they weren’t, the player wouldn’t be able to ‘slide’ along a wall.

Make it run
We have all this code but it displays only one frame - way too short for a game... Let's throw it in an infinite loop so that it runs forever!

Conclusion
As you can see, a raycaster engine is very easy to make and the effect looks awesome! I hope you learnt something new and if you want to see the code in its entirety, you can do this here!